Please be aware: This guide refers to the directions as left, right, up, and down. When it does, it is referring to the key you press, not the isometric view.
As of 3/2021, a new video tutorial can be found HERE.
If you just need visuals, you can download the entire picture library HERE.
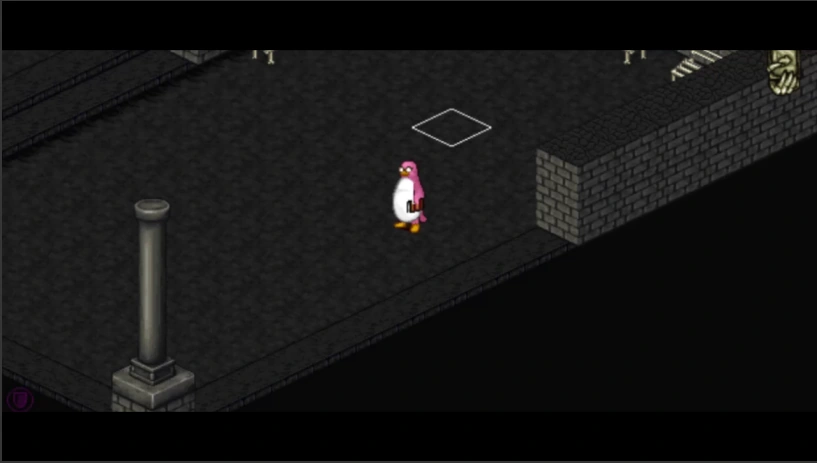
Part 1: Entrance[]

This section is fairly straight-forward; walk to the left and take the 2nd staircase from the top.
Part 2: 4x4 Stairs[]
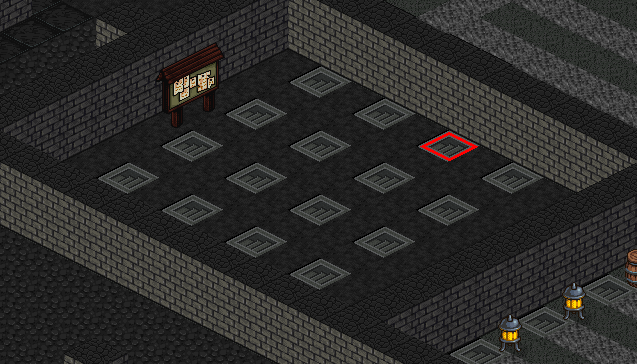
This section is filled with 16 staircases. Take the 3rd staircase in the upper row and be warped to the next section.
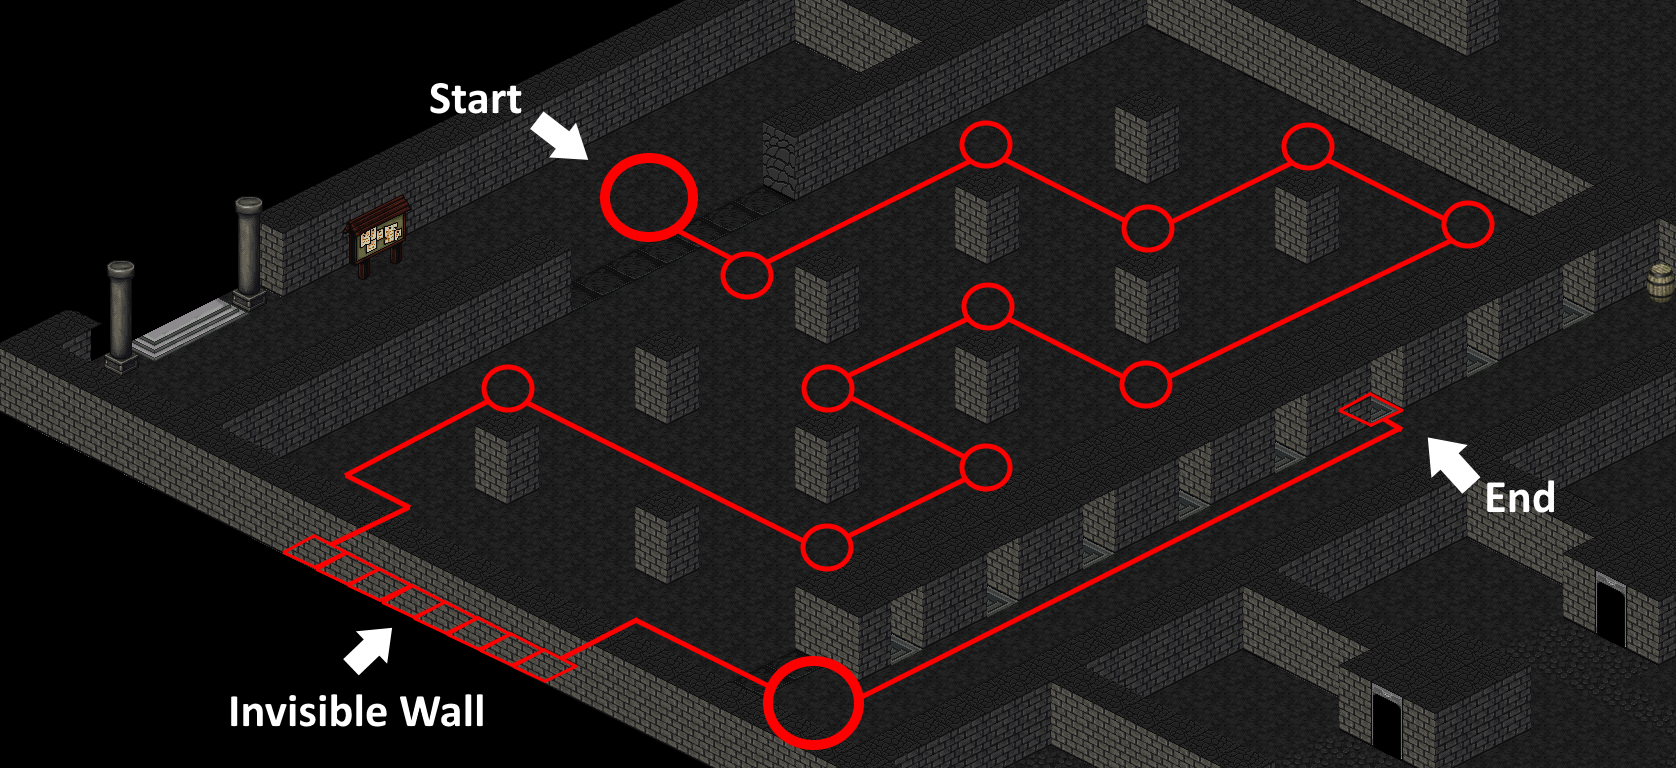
Part 3: Fake Wall Warp[]
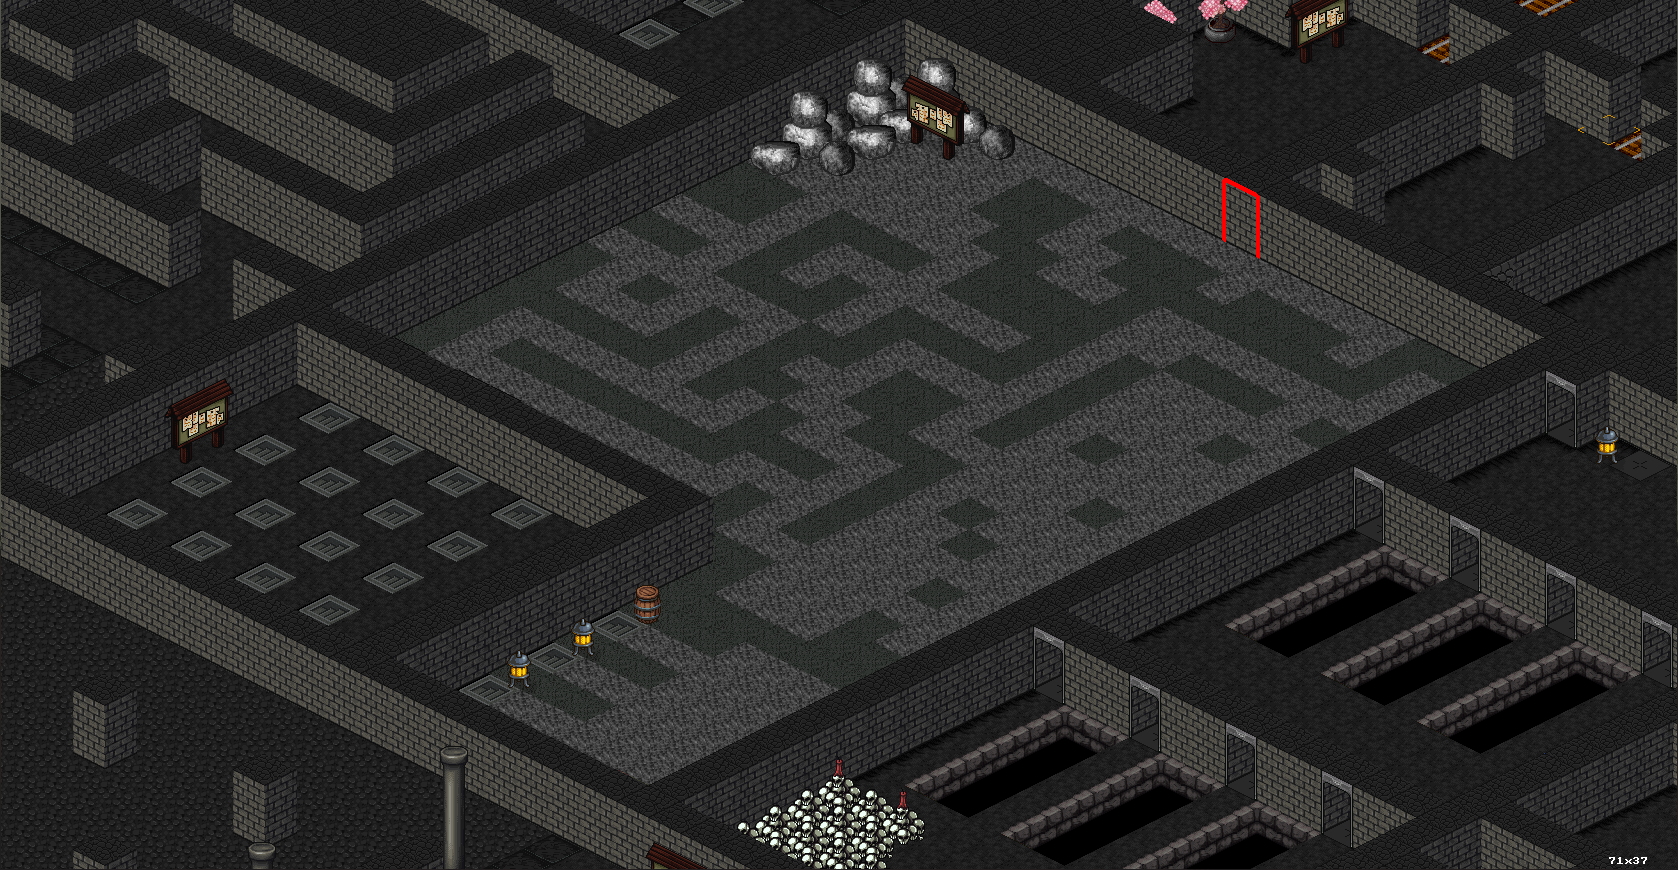
This section is deceiving to look at, but is also fairly quick and simple. Stay on the light-gray tiles and walk through the fake wall tile along the top wall to be warped to the next section.
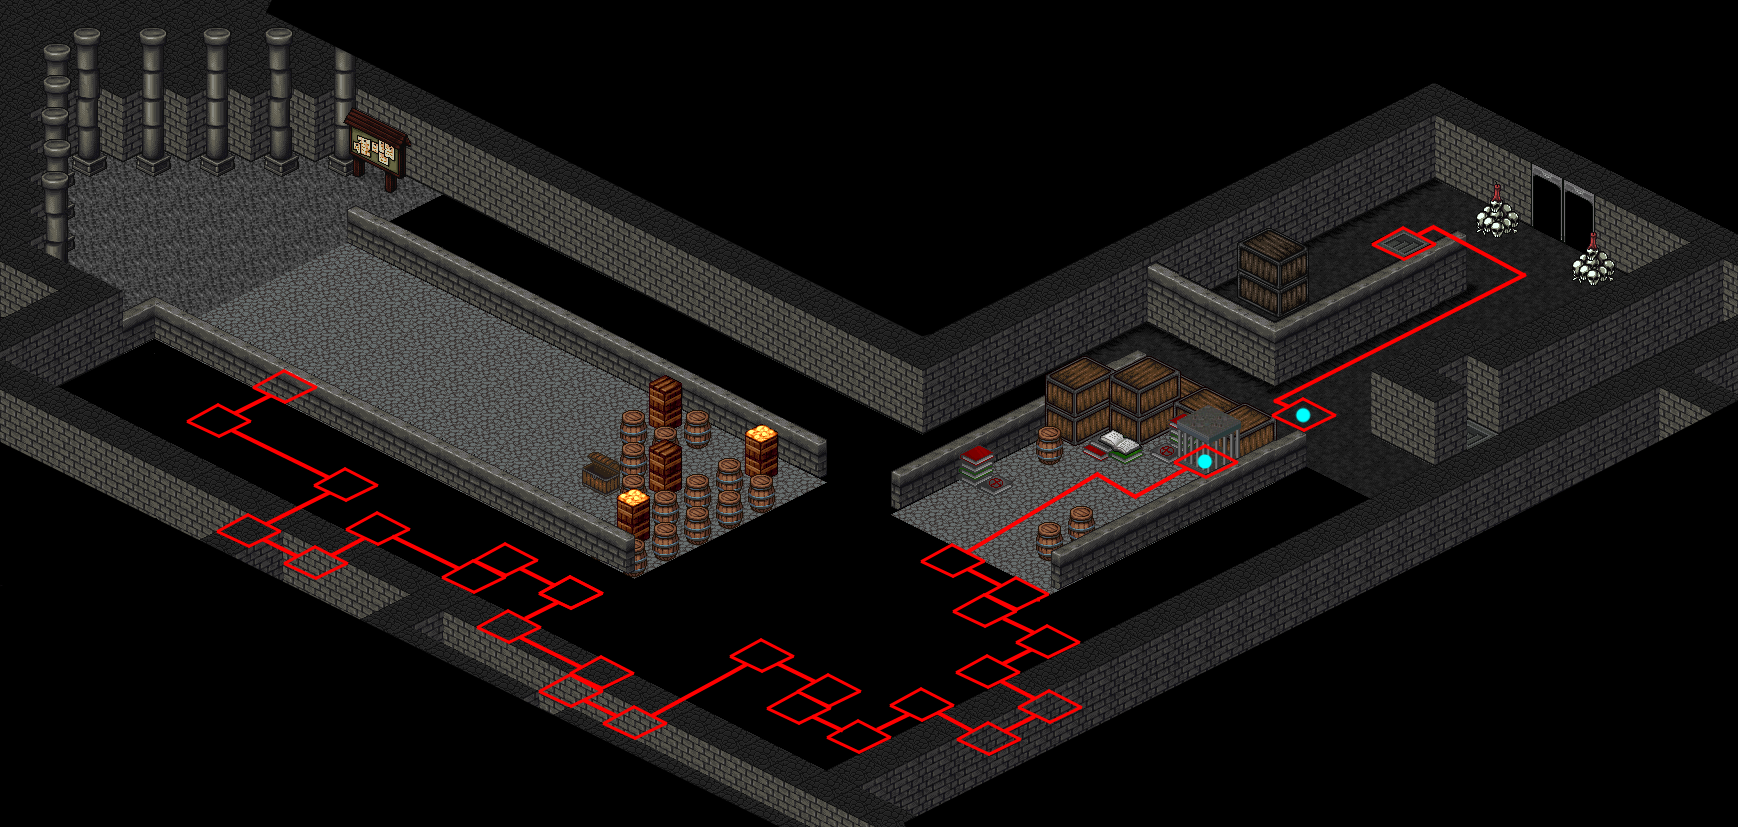
Part 4: Turning Pillars[]
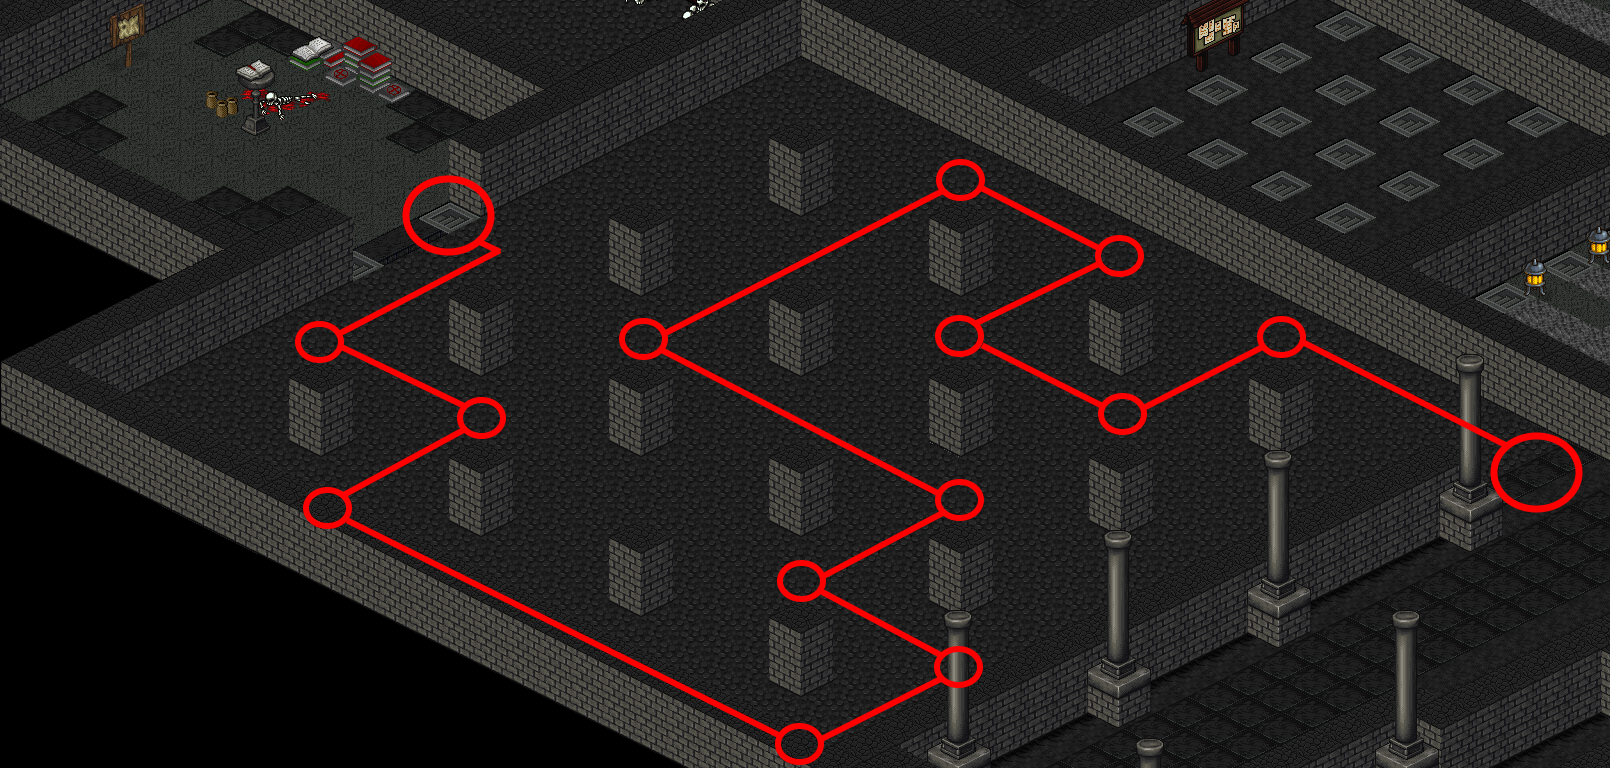
You will begin on the Right side of this section. Consider each section a square (or count the pillars) and take the following turns:
- 2 Left
- 1 Down
- 1 Left
- 1 Up
- 1 Left
- 2 Down
- 2 Right
- 1 Down
-
- 1 Right
- 1 Down
- 3 Left
- 1 Up
- 1 Left
- 1 Up
Part 5: Fake Wall to Stairs[]

You will spawn in the middle of the lower room. Please go Down, Left x3, Up, Left, Up, Left, Up x2, Right, Up to get through the wall, then go in the 2nd doorway to get warped to the next section.
Part 6: Numbered Stairs[]

Each section will have a number written in light-gray tiles to represent which section you are in. Follow below:
- Door 4
- Door 1
- Door 5
- Door 3
- Door 2
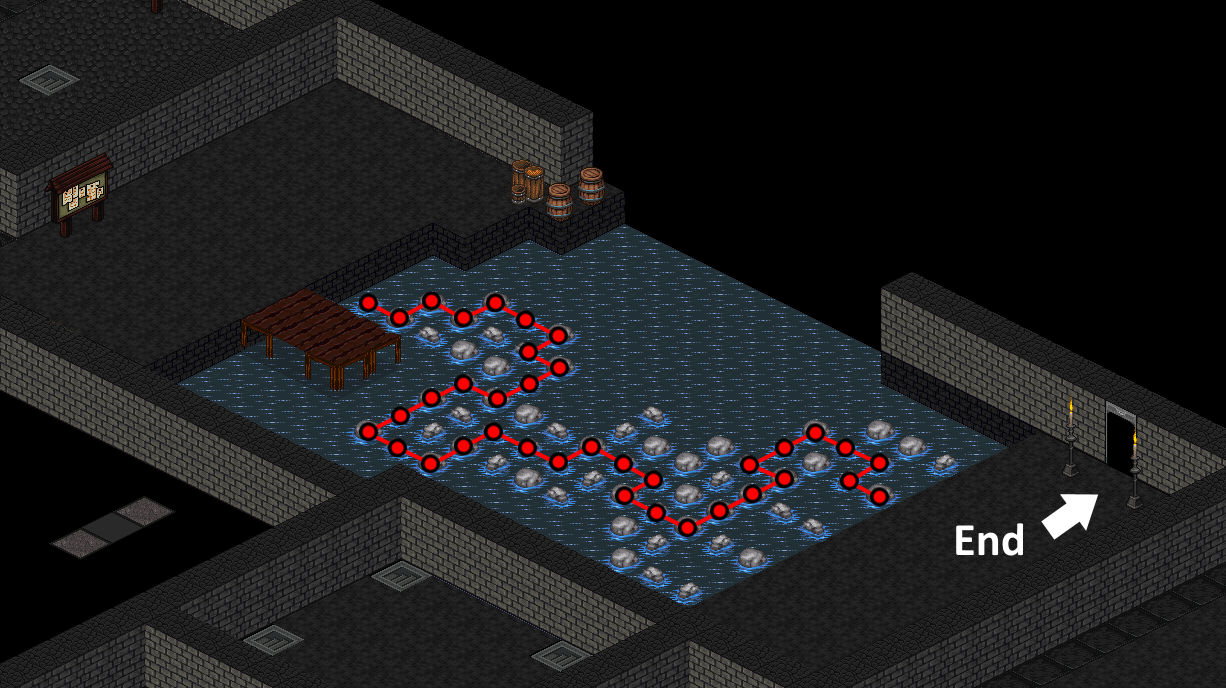
Part 7: Spiral Ice[]

This section is complicated, it is recommended to refer to the picture guide for this one, as you need to follow in specific spots or you will be warped back to the beginning. Starting from the first red square on the far right side, do the following:
- 3 Left
- 3 Down
- 1 Left
- 1 Down
- 14 Left
- 2 Up
-
- 1 Left (into the wall)
- 3 Up
- 1 Right (out of wall)
-
- 3 Up
- 13 Right
- 6 Down
- 11 Left
- 4 Up
- 9 Right
- 2 Down
- 7 Left
Part 8: Stairs of Darkness[]

In this section, you'll go through a few warps, follow specific black ground tiles, and do 2 more warps. First, take the warp on the Right, then Up, then Right, then Left. After this, you'll need to walk in the following pattern:
- 3 Right
- 2 Down
- 3 Left
- 1 Down
- 2 Left
- 1 Up
- 3 Left
- 1 Up
-
- 1 Left
- 1 Up
- 2 Left
- 2 Down
- 1 Left
- 1 Down
- 7 Left
After that, take the warp Up, then Down to be warped to the next section.
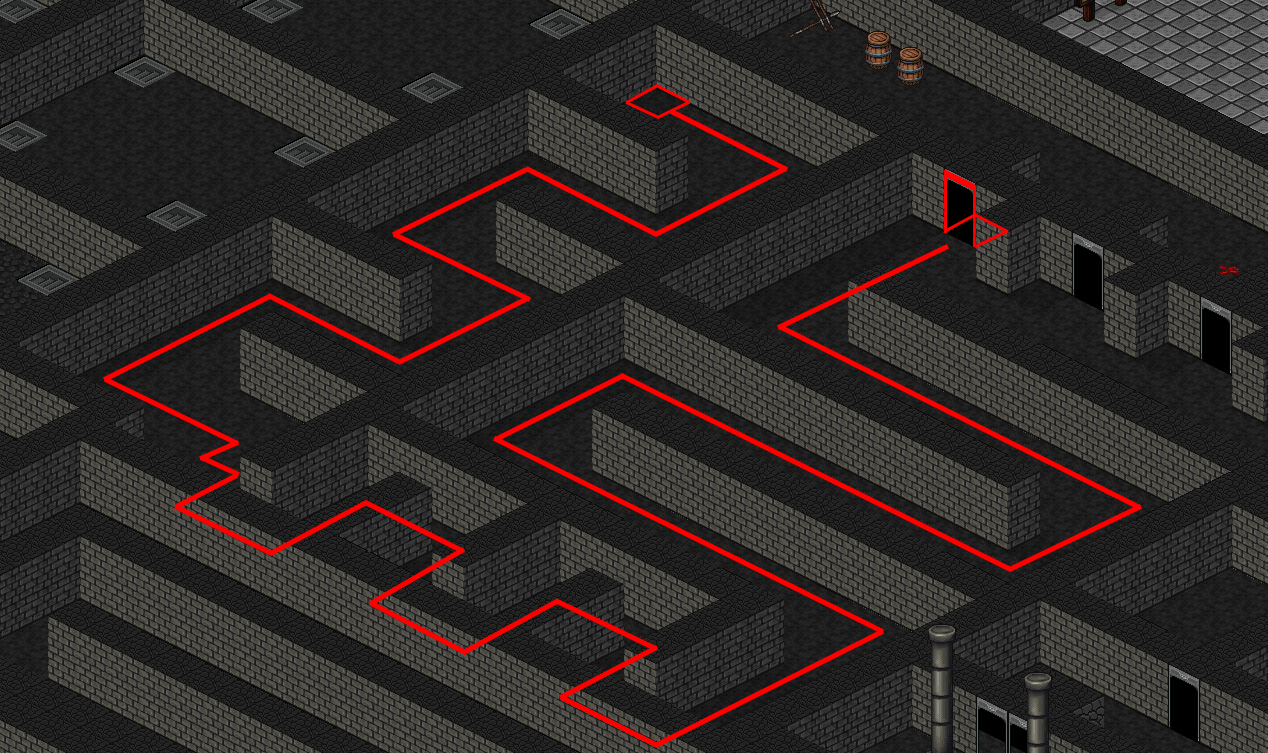
Part 9: Hedge Maze[]

This section doesn't have any tricks other than a few hidden warps, please follow the accompanying picture to get through this section easily.
Part 10: Pick the Right Stairs[]

Just like the last section, this one is not difficult either. There is a hidden warp in the walls below you, use this warp instead of any of the stairs to the right. After that, you will be warped into the section with the dark-gray floor; simply walk to the Upper-Right side of the map and use the staircase to be warped to the next section.
Part 11: Fake Ground[]
This section also has you walk on black ground tiles to get to the section on the right, then use a hidden warp. Once you are at the first red square on the Left side, do the following:
- 2 Down
- 4 Right
- 3 Down
- 2 Right
- 2 Up
- 3 Right
- 1 Up
- 2 Right
-
- 2 Down
- 3 Right
- 1 Down
- 2 Right
- 4 Up
- 2 Right
- 1 Down
- 2 Right
-
- 2 Up
- 2 Right
- 2 Up
- 2 Left
- 2 Up
- 2 Left
- 1 Up
- 2 Left
After that, head Up and walk into the Iron Cage to be warped to the upper section. Then, head Up and Left and step on the staircase to be warped to the next section.
Part 12: Skulls Maze[]

Another straight-forward part, just make sure to follow the picture guide and do not use any of the staircases; the real warp to the next section is found at the Upper-Right section disguised as a dis-colored tile.
Part 13: Abyss 1[]

(Additional reminder: directions refer to arrow keys, not isometric direction).
First, make sure to use the Upper-Left warp spot to get sent to the correct section (if you're following the picture, it will take you to the blue section). Then, do the following for each section:
Blue Section[]
- 2 Down
- 3 Right
- 3 Up
- 1 Right
- 2 Up
- 1 Right
- 1 Up
- 3 Right
- 2 Down
- 1 Left
- 2 Down
Yellow Section[]
- 2 Down
- 2 Left
- 1 Up
- 1 Left
- 4 Up
- 3 Right
- 4 Up
- 1 Left
- 2 Up
- 3 Right
- 2 Up
- 1 Right
- 7 Up
- 3 Left
- 2 Down
Red Section[]
- 2 Up
- 2 Right
- 4 Up
- 2 Right
- 4 Up
- 3 Left
- 2 Up
- 3 Right
- 3 Up
- 2 Left
- 1 Down
- 3 Left
- 2 Up
- 2 Right
- 2 Up
Part 14: In the Wall[]

Very easy section, simply head Right, then walk into the wall in the very Down-Right corner to be warped to the next section.
Part 15: Door Paths[]

Take the 4th door, all the way to the Right. Then, the 2nd door on the Left. After that, walk to the very Upper-Right corner and walk into the wall to be warped to the next section.
Part 16: Train Tracks of Doom[]

It is highly recommended to use the picture guide for this section. First, you'll need to walk through 3 fake walls to get to the warp points. The first wall you can walk through the Middle, the second wall you can walk through the Top, and the third wall you can walk through closer to the Bottom. Then, head Up to the train tracks and onto the warp point. After warping, head Down on the tracks to the next warp point. Next, head Left onto the next warp point. After this warp, do the following:
- 1 Up
- 3 Right
- 7 Down
- 13 Left
- 2 Down
- 3 Left
- 6 Down
- 9 Left
-
- 2 Down
- 4 Left
- 2 Up
- 7 Left
- 6 Up
- 2 Right
- 3 Up
- 2 Right
-
- 3 Up
- 3 Right
- 1 Down
- 5 Right
- 2 Up
- 6 Right
- 3 Up
- 4 Left
-
- 5 Up
- 2 Right
- 1 Down
- 1 Right
- 2 Down
- 2 Right
- 2 Up
- 5 Right
-
- 2 Down
- 1 Left
- 2 Down
- 1 Right
- 2 Down
- 2 Right
- 4 Up
- 3 Right
- 1 Down
- 2 Right
- 2 Up
After you've reached the area with the pillar in the middle head to the Right and use the 3rd staircase down to be warped to the next section.
Part 17: Through Walls[]

Much simpler than the previous part, just gotta walk through some fake walls. First wall you can walk through close to the Right side, then the far Right side, then the far Left side, and again the far Left side. After that, take the 3rd warp point to be warped to the next section.
Part 18: Halfway Checkpoint[]

Please note: you can use this spot to leave the maze or take a rest. Once you are ready, head to the Right and continue to the next section.
Part 19: Turning Pillars 2[]
You will begin on the Left side of this section. Consider each section a square (or count the pillars) and take the following turns:
- 1 Right
- 2 Up
- 1 Right
- 1 Up
- 1 Right
- 2 Down
- 1 Left
- 1 Down
- 1 Right
- 1 Down
- 2 Left
- 1 Down
- Use the Bottom wall to avoid warps by stepping into the wall, then go up once you've reached the other side.
After that section, head UP and enter the 6th staircase to be warped to the next section.
Part 20: Fake Floor[]

Once you've reached the first red square on the Left side, do the following:
- 3 Up
- 4 Left
- 4 Up
- 4 Right
- 2 Down
- 2 Right
- 4 Up
- 2 Right
-
- 1 Down
- 1 Right
- 1 Down
- 3 Right
- 2 Up
- 3 Right
- 3 Down
- 2 Left
-
- 4 Down
- 3 Right
- 3 Up
- 2 Right
- 1 Down
- 3 Right
- Head Up into the wall, then into the staircase to be warped to the next section.
Part 21: Abyss 2[]

(Additional reminder: directions refer to arrow keys, not isometric direction).
Similar to Part 13, you'll need to walk along the black ground tiles and avoid hidden warps. For this section, walk Up and use the warp point to be sent to the Yellow Section.
- Yellow Section
- 2 Right
- 3 Down
- 3 Right
- 5 Up
- 2 Left
- 2 Up
- 6 Right
- 2 Down
- 4 Right
- 4 Down
- 7 Right
- 1 Down
- 4 Right
- 5 Up
- 2 Left
- 3 Up
- 2 Right
- Blue Section
- 3 Down
- 4 Left
- 2 Up
- 1 Left
- 3 Up
- 1 Right
- 4 Up
- 3 Left
- 1 Up
- 2 Left
- 2 Down
- 3 Left
- 2 Up
- 2 Left
- 2 Up
- 3 Left
- 2 Down
- 2 Left into the wall.
Part 22: Hopping Stones[]
You must hop along the stones in a specific order to avoid hidden warps. Head to the very Upper-Right of the bridge, then do the following:
- 2 Up
- 1 Right
- 1 Up
- 2 Right
- 1 Down
- 1 Right
- 2 Down
- 1 Left
-
- 3 Down
- 2 Right
- 2 Up
- 2 Right
- 1 Up
- 2 Right
- 1 Down
- 2 Right
-
- 3 Up
- 1 Left
- 2 Up
- 2 Right
- 1 Down
- 2 Right
Part 23: Pick a Door[]

Very easy part, simply walk Right, then Up, head to the 2nd row of doors, and take the one on the Right.
Part 24: So Many Stairs[]

A simple section, just make sure to take the following staircases in this order:
- Bottom-Left
- Bottom-Right
- Bottom-Right
- Bottom-Right
- Bottom-Left
- Upper-Right
- Bottom-Left
- Bottom-Left
- Upper-Right
- Upper-Left
Part 25: Chairs[]

You'll spawn by some spears and barrels, walk into the wall directly to the Right of the barrels to be warped above. Then, head around the table, and sit on the 3rd chair down on the Right side to be warped to the next section.
Part 26: Through Walls 2[]

Upon being spawned here, walk Left 1 tile and you'll be on the spot marked by a Star Symbol on the picture. Then, do the following:
- 2 Up
- 3 Right
- 4 Down
- 4 Left
- 2 Down
- 4 Right
- 3 Down
- 5 Left
-
- 2 Up
- 1 Left
- 7 Up
- 1 Right
- 3 Up
- 5 Right
- 2 Up, then head into the door on the Right.
Part 27: Simple Maze[]
No tricks to this part, simply follow along the path and take the very Left side door to be warped to the next section.
Part 28: Complex Maze[]

While this section looks complicated, it only has a few sections where you can get lost. If you either follow the left-hand wall or reference the picture, you should be able to walk through with no issues, and at the end take the door on the Right side to be warped to the next section.
Part 29: Through Walls 3[]

In this section, you can walk through the Middle part off most of the walls, so it is slightly easy to get lost here. Consider each section a square and take the following turns:
- Down
- Right
- Up
- Right
- Down
- Right
- Up x2
- Right
-
- Up x2
- Left
- Down
- Left
- Down
- Left
- Up
- Left, then walk along the path to the obvious exit.
Part 30: Easy End[]

Simply follow along the Right wall and walk into the wall to enter the very last room of the maze and finish the quest / claim your reward.
Congratulations! You've finished the Bones Underground Maze!